Products
Tuner Dashboard

How To… Raising The Rev Limiter
Raising the Rev-Limiter with the Unichip
You have two options
1 – Use the i-Driver
2 – Use the rev limiter unit
![]()
Using the i-Driver to raise the factory rev limit.
On many vehicles the rev limiter is control by closing the injectors at a predetermined RPM point. With the i-Driver the Unichip will monitor the injector on time and keep the injectors open after the ECU closed the injectors. By keeping the injectors open after the ECU close the injectors we can raise the rev limiter. The focus on this article is not the i-Driver but the rev limiter module. I will write another article on how to use the i-Driver at a later point.
![]()
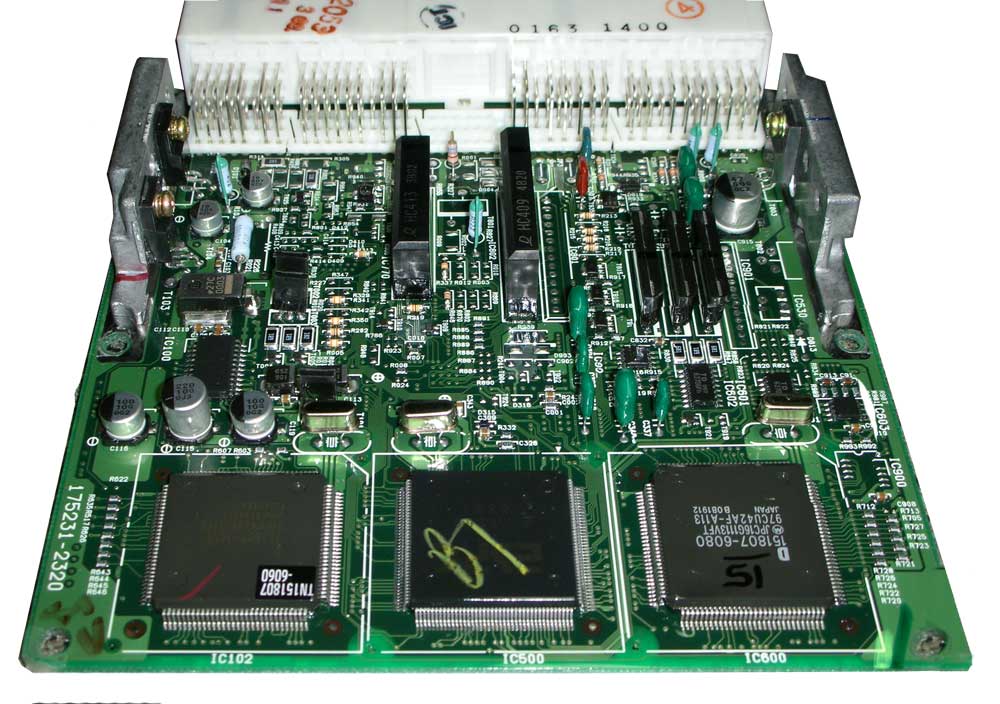
Using the Rev Limiter unit to increase the rev limit.
The modern ECU does advanced computations set by the clock speed. Clock speed is a measure of how quickly a computer completes these computations or operations. It is measured as a frequency in hertz, and most commonly refers to the speed of the computer’s CPU, or Central Processing Unit. The speed of the ECU is set by a crystal, if we increase the frequency of the crystal located inside the ECU we will raise the rev limiter.
The higher the frequency (above the original frequency) the higher the rev limiter will be. Let’s assume that the engine’s limiter is at 6000 RPM and it has an 8-Megahertz crystal in it. If you change the crystal by 5% to 8.4-Megahertz the limiter will also go up by 5% to 6300 RPM. If you change the crystal by 10% to 8.8-Megahertz the limiter will also go up by 10% to 6600 RPM.
| Warning: Higher RPM puts a lot of extra stress on engine components especially on aftermarket forced induction vehicles such as supercharger and turbo applications. |
![]()
Detailed Steps (see images below – click to enlarge)
- Open the ECU (engine control unit)
- With the ECU connected to the harness turn on the ignition and find a + 5 volt supply and a ground connection inside the ECU
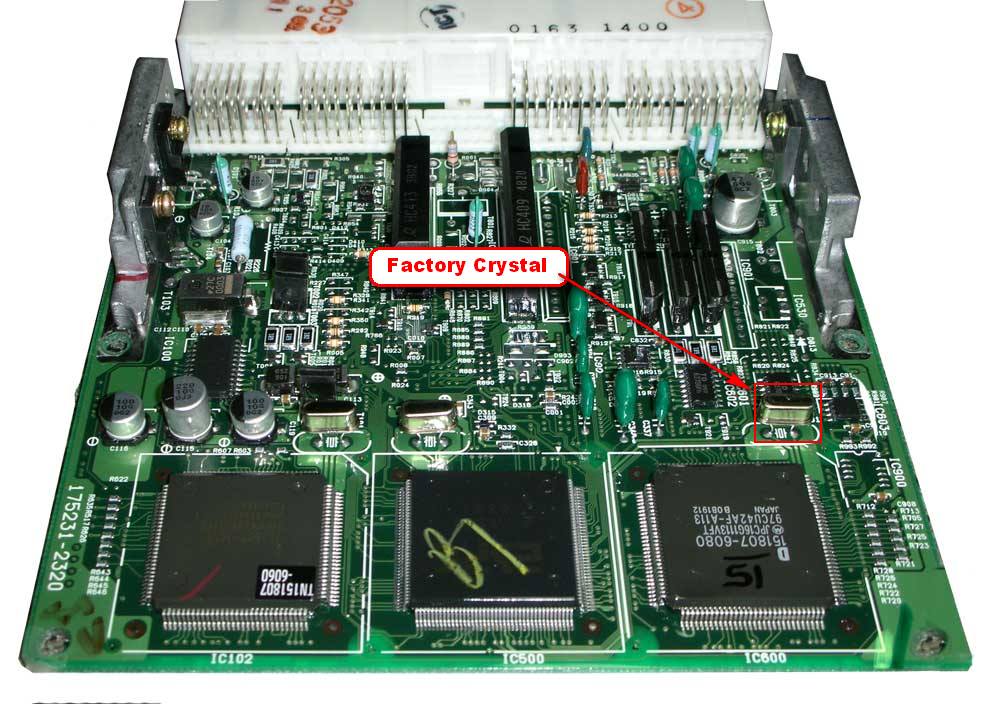
- Identify the crystal in the picture
- De-solder the crystal and solder the holes closed
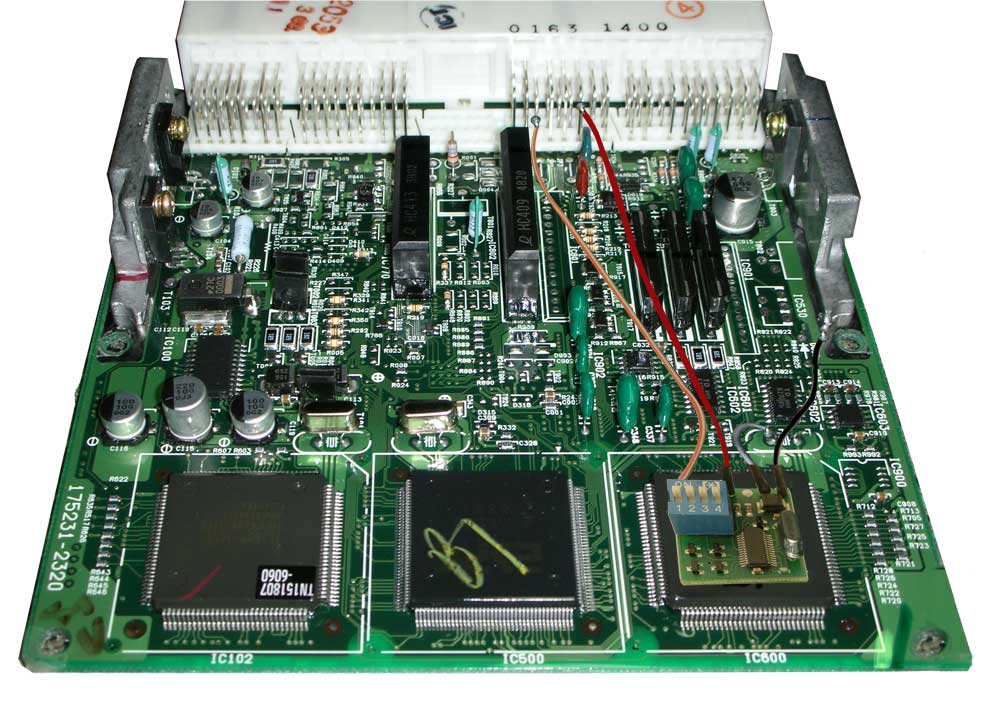
- Mount the rev limiter unit inside the ECU (use silicon to keep it in place)
- Solder the crystal any way round into the socket on the rev limiter unit
- Connect the red wire to the +5V
- Connect the black wire to the ground
- Connect the grey wire to one of the connections where the crystal came out
- Start the vehicle
- Make sure there are no check engine lights.
- Set the dip switches to the desired rev limit
- 1 on = 2%
- 2 on = 4%
- 1 and 2 on = 6%
- 3 on = 8%
- 1 and 3 on = 10%
- 2 and 3 on = 12%
- 1, 2 and 3 on = 14%
- 4 on = 15%
- Run the vehicle and check that the rev limiter is still at the original point.
- Touch the red/white wire to ground and check that the rev limiter is higher than stock
- See the section below on how to configure the software
 |
Important! |
![]()
Click on image to enlarge
 |
 |
 |
 |
 |
![]()
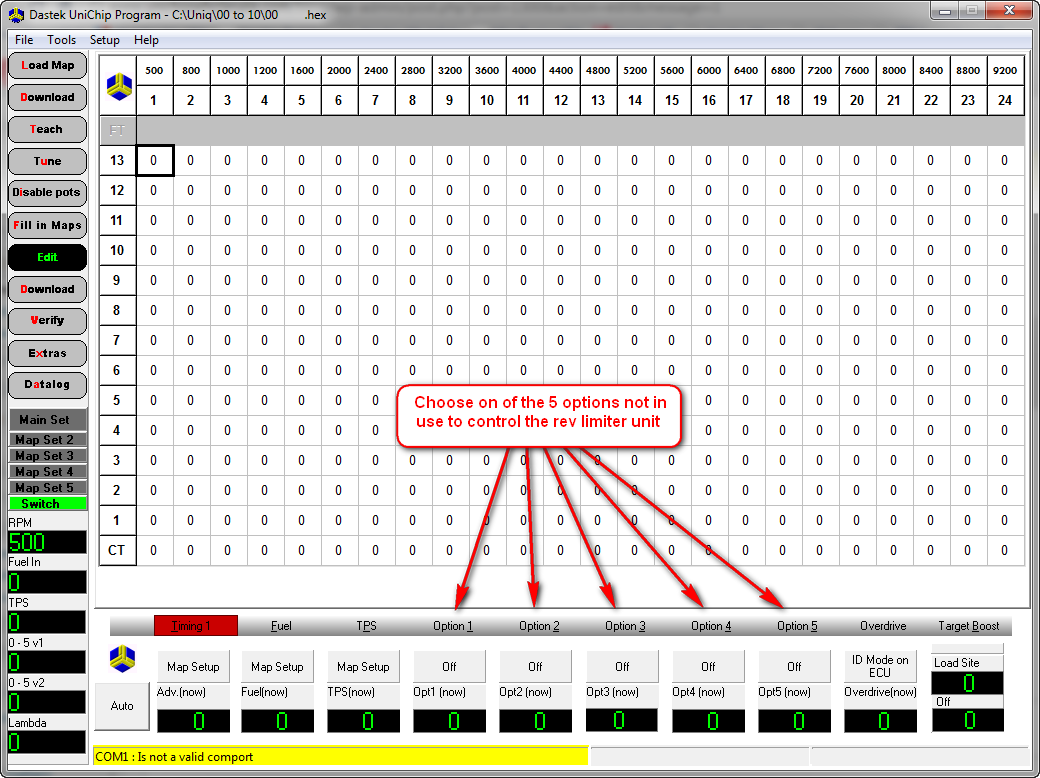
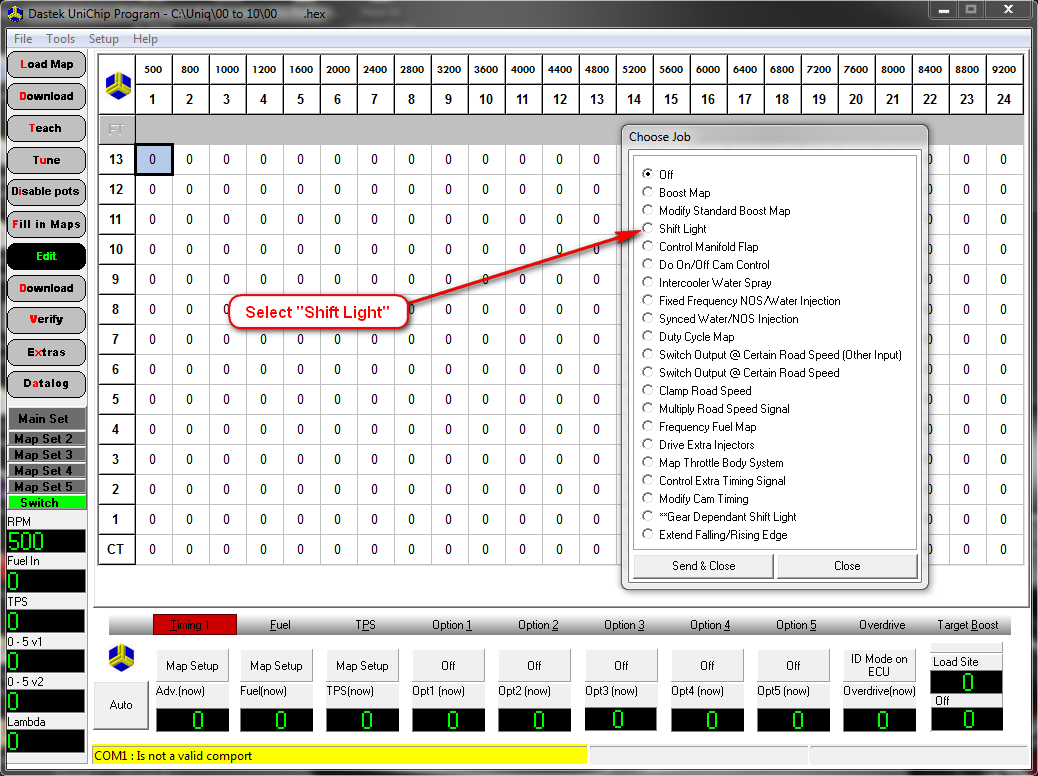
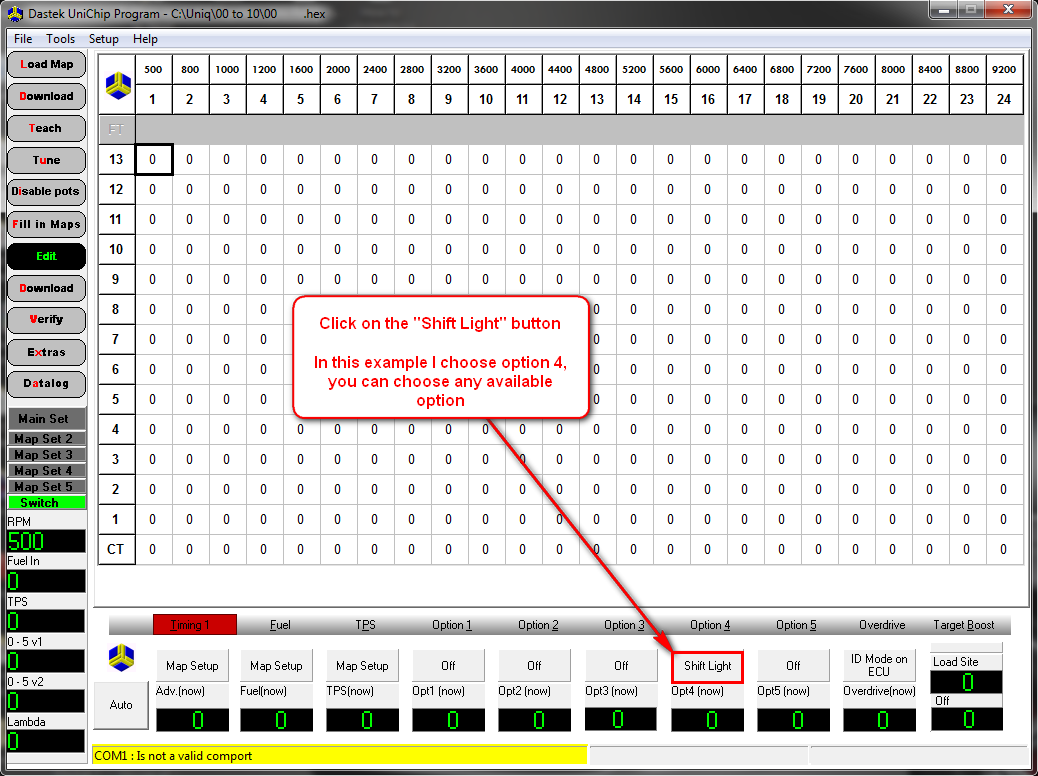
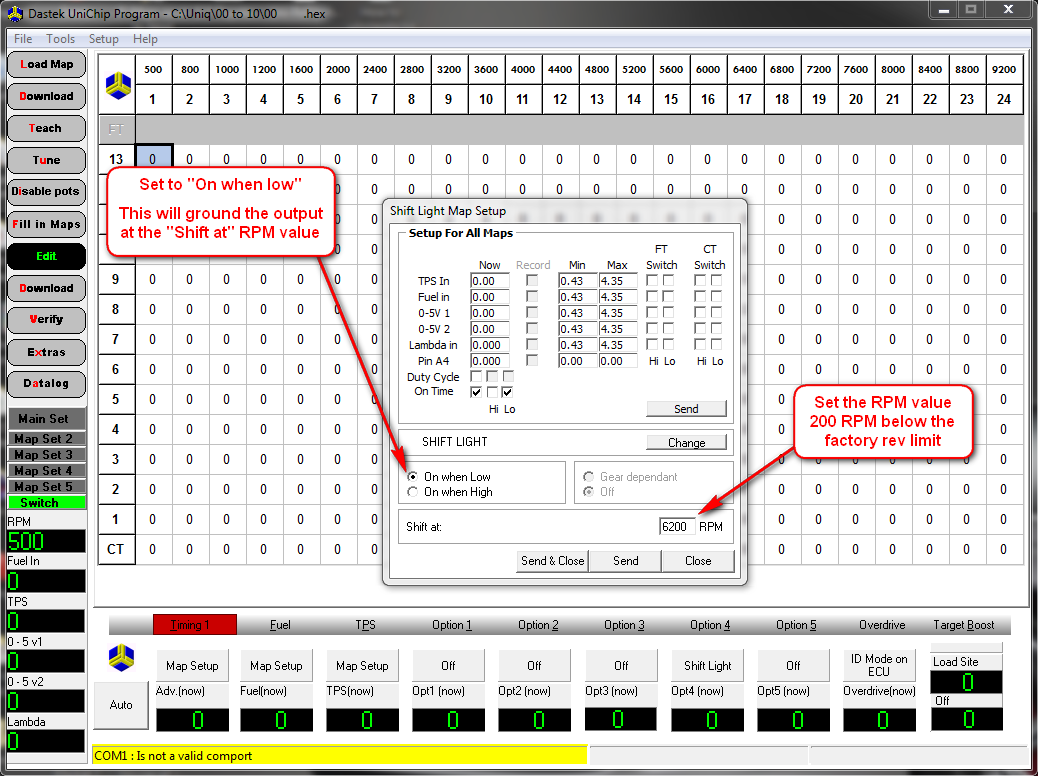
Unichip Software Settings
- Now use the Unichip to do the switching for you by setting any one of the 5 available options to “activate shift light”
- Set it to “on when low”
- Set the “shift at” value to 200 RPM lower than the standard rev limiter
- Connect the Red/White wire to the Unichip option selected in step 15
Click on image to enlarge
 |
 |
 |
 |
 |
| Tip! Also read page 398 in the Unichip User / Dealer manual for a detailed instructions and more information not discussed in this help article. |
![]()